
Asset Management Power App User Interface
Building a user-friendly interface (UI) is a critical part of developing an efficient Asset Management App in Power Apps. The UI defines how technicians and administrators interact with the app, and it should focus on simplicity, clarity, and functionality. In this section, we’ll break down the design of a technician dashboard, asset details screen, and an admin dashboard using the example app you’ve developed.
1. Technician Dashboard
The Technician Dashboard provides an overview of assigned tasks and equipment details. Based on the screenshot you shared, here’s how it’s structured:
Features:
Task List Panel:
A vertical list on the left displays all assigned tasks and equipment details.
Tasks are categorized by equipment name, type, and status (e.g., "Needs Replacement" or "Needs Repair").
Selecting a task updates the details on the right panel.
Details Panel:
Displays detailed information about the selected equipment, including:
Equipment Name
Asset ID
Description of the issue or task
Interactive map pinpointing the equipment’s location.
Map Control:
Embedded map to guide the technician to the asset location.
Dynamic markers highlight asset locations.

Technician Dashboard
2. Asset Details Screen
The Asset Details Screen is designed to provide an in-depth view of an asset and its maintenance history.
Features:
Asset Overview:
Displays key asset details, such as Equipment Name, Asset ID, and Type.
Includes a map for location tracking.
Maintenance Records:
A panel on the right lists past maintenance activities, including:
Technician Name
Date of Maintenance
Maintenance Description
Action Button:
A "New" button allows the user to log new maintenance records.

Asset Details
3. Maintenance Logging Screen
This screen is designed to help technicians log maintenance activities for specific equipment.
Features:
Step-by-Step Input:
Step 1: Scan the Asset:
A button to scan the asset's barcode using the Barcode Scanner Control.
Displays an error message if the scanned asset doesn’t match the one currently being viewed.
Step 2: Update Status:
A dropdown menu to select the status (e.g., "Repaired," "Requires Follow-Up").
Step 3: Add Notes:
A multiline text input for detailed notes about the maintenance activity.
Step 4: Add Image:
An image upload option to attach photos of the equipment or repairs.
Save Button:
A prominently placed button at the bottom to submit the maintenance record.
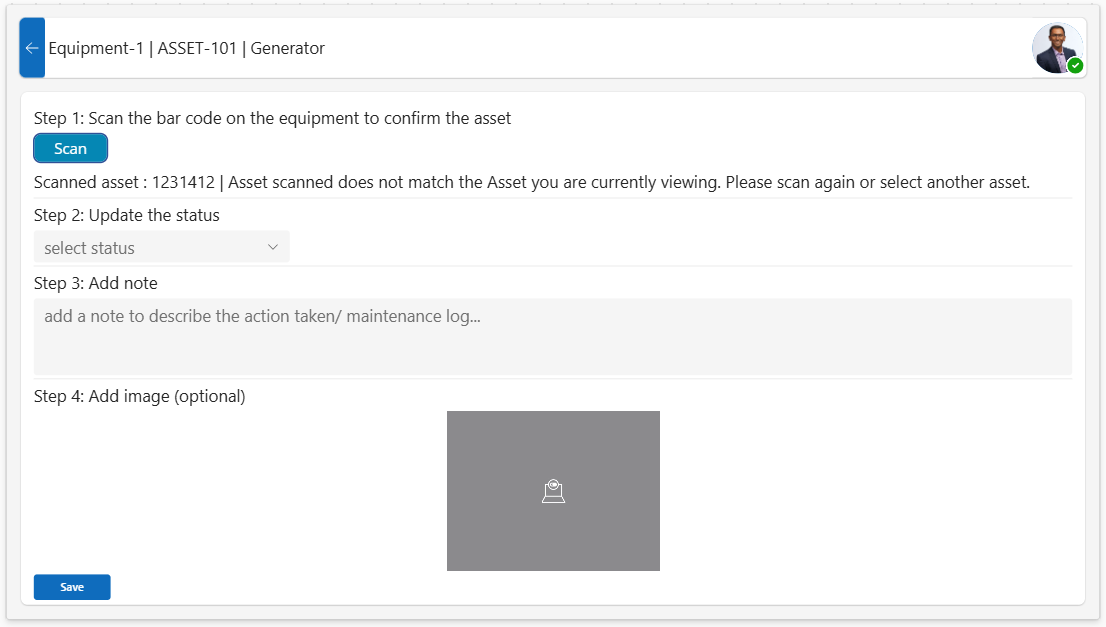
Maintenance Logging
4. Admin Dashboard
The Admin Dashboard enables administrators to assign tasks and manage equipment efficiently.
Features:
Equipment List Panel:
A list of all equipment on the left, similar to the Technician Dashboard.
Includes basic details like Equipment Name and Asset ID.
Task Assignment Panel:
A form on the right for assigning tasks to technicians.
Fields include:
Technician Dropdown: To select the technician.
Task Dropdown: To choose the task type (e.g., "Needs Repair").
Task Description: A multiline input to add specific instructions.
Assign Button:
A button to save and assign the task to the selected technician.

Admin Dashboard
Conclusion
The user interface is the heart of your Asset Management App. By focusing on clear layouts, interactive elements, and functional designs, you’ve created a highly intuitive app for technicians and administrators. From the task overview in the Technician Dashboard to the streamlined workflows in the Maintenance Logging Screen, your design ensures users can perform their tasks efficiently and effectively.