
Automate Approvals Using Power Automate
Approvals are the lifeblood of many business processes, especially in procurement. Yet, they’re often bogged down by manual tasks, email clutter, and delays. Power Automate eliminates these inefficiencies by automating approvals based on predefined conditions such as the type of request or approval thresholds. In this guide, we’ll build an approval automation workflow where requests are routed based on the component type and amount threshold.
Real-Life Scenario
Company ABC procures different components such as IT hardware, office supplies, and production equipment. The approval process depends on:
The component type:
IT hardware: Approved by the IT Manager.
Office supplies: Approved by the Admin Manager.
Production equipment: Approved by the Operations Manager.
The amount threshold:
Requests under $1,000 are routed to the manager level.
Requests exceeding $1,000 are escalated to the Director level.
Ingredients
Microsoft Power Automate access.
SharePoint list or Excel file for storing approval requests.
Approvers repository for dynamic routing.
Preparation
1. Set Up the Approval Matrix
Create a SharePoint list called Approvers with the following structure:

Approval Matrix
2. Create a Procurement Requests List
Create another SharePoint list called Procurement Requests with the following columns:

Procurement Requests List
3. Create a Form for Users to Submit the Procurement Request

SharePoint form
Steps to Build the Workflow

Approvals using Power Automate
Step 1: Trigger the Flow
Go to Power Automate and create a new Automated Cloud Flow.
Select the trigger When an item is created (for the Procurement Requests list).
Step 2: Conditional Approver Mapping
Add a Condition to check the Amount:
If
Amount <= 1000:Add the Get items action to fetch data from the
Approverslist.Use OData filtering component type = component in the procurement request and approver level = Manager
If
Amount > 1000:Add the Get items action to fetch data from the
Approverslist.Use OData filtering component type = component in the procurement request and approver level = Director

Get items with a filter query
Step 3: Extract Approver Emails Using Select
Use Select step in Power Automate to extract the column storing the Approver Emails from the Get Items step.
Select statement returns an array, which can then be converted to a semi-colon separated string using the Join function
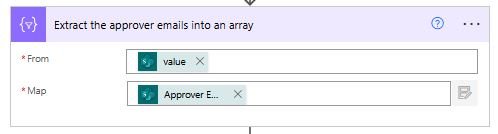
Extract the emails using select steps
Step 4: Initiate Approval
Add the Start and wait for an approval action.
Set the approval type to Approve/Reject – Everyone must approve.
Use the stored email variable to dynamically assign the approver.
Include request details in the approval message, such as:
Requester Name.
Component Type.
Amount.

Power Automate approvals workflow
Step 5: Handle Approval Responses
Add a Condition to evaluate the approval outcome:
If Approved:
Update the
Statuscolumn in theProcurement Requestslist to Approved.Notify the requester via email.
If Rejected:
Update the
Statuscolumn to Rejected.Notify the requester with the rejection reason.
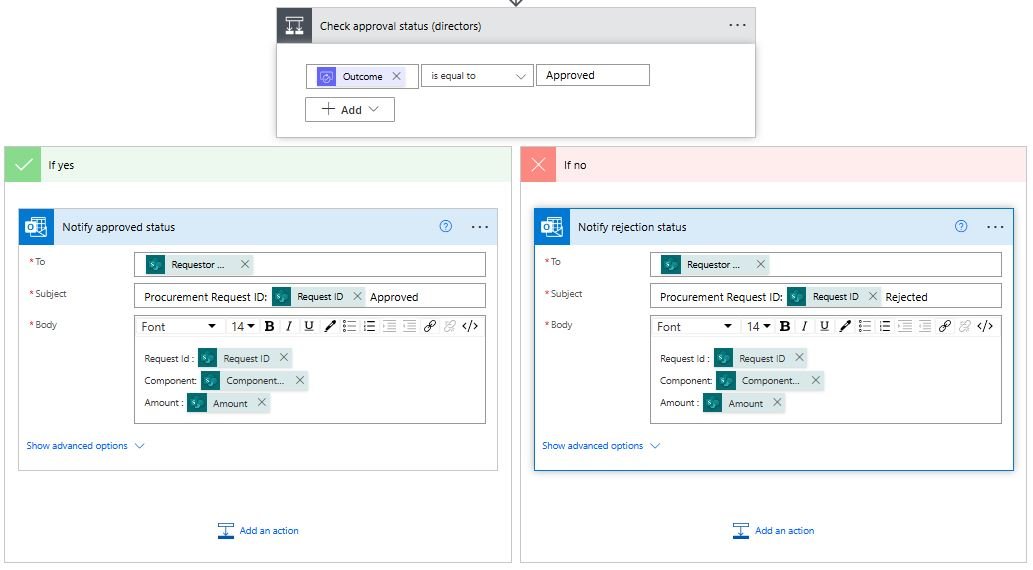
Notify the requestor via email about the status of the procurement request.
Key Benefits
Eliminates Manual Errors:
Dynamic approver routing ensures requests are sent to the correct individual every time.
Speeds Up Approvals:
Notifications and reminders prevent delays caused by missed emails.
Enhances Transparency:
Requesters can track status updates in real time.
Improves Compliance:
Built-in audit trails log every decision for future reference.
This workflow not only automates your approval process but also brings clarity and efficiency to your procurement system. Start building this workflow today and experience the transformative power of automation!
Want to see how approval workflows can transform other business areas? Check out our detailed guide: 10 Everyday Processes to Automate with Power Automate Approvals.