
How to Automate Invoice Generation with Power Automate
Invoicing is a critical process for businesses, but it can be time-consuming and error-prone when done manually. By leveraging Power Automate, Microsoft’s powerful low-code automation platform, you can create a streamlined and scalable invoice automation workflow that saves time, reduces errors, and enhances productivity.
In this guide, we’ll walk you through a step-by-step process for automating invoice generation using Power Automate. Whether you’re managing invoices for a small business or handling bulk invoicing for a large enterprise, this tutorial will help you build an automated invoice workflow that meets your needs.
Step-by-Step Guide to Automate Invoice Generation
Here’s how you can create an automated invoice workflow using Power Automate. This example demonstrates generating invoices based on data from a SharePoint list and populating a pre-designed Word template.
Step 1: Prepare Your Invoice Template
Open Microsoft Word and create an invoice template. Use placeholders for dynamic content, such as:
Invoice Number: {{InvoiceNumber}}
Client Name: {{ClientName}}
Invoice Date: {{InvoiceDate}}
Total Amount: {{TotalAmount}}
Save the Word template to OneDrive or SharePoint.

Microsoft Word Template
Refer: How to Create a Word Template for Automation Using the Developer Tab
Step 2: Prepare Your Data Source
Create a SharePoint list with the following columns or connect to existing data source such as Dataverse or Excel
We need 2 lists:
Items/ Product List
Item ID
Item Description
Item
Invoice List
Item ID
InvoiceNumber
ClientName
InvoiceDate
TotalAmount
Email (optional, for sending invoices)
Step 3: Build the Workflow in Power Automate
1. Log In and Create a New Flow
Go to Power Automate and sign in with your Microsoft account.
Click Create > Instant cloud flow.
Choose a trigger: "When a file is created or modified" (to update automatically for example when the status changes to “order confirmed”) or "Manually trigger a flow" (for on-demand invoicing) or “Power Apps” (if you have a Power Apps interface to trigger the flow)
2. Add an Action to Populate the Word Template
Use the action "Populate a Microsoft Word template".
Select your Word template from OneDrive or SharePoint.
Map each placeholder (e.g., {{InvoiceNumber}}, {{ClientName}}, {{TotalAmount}}) to the corresponding dataset columns.
3. Save the Generated Invoice
Add the action "Create file" to save the output file in a designated folder:
Choose your SharePoint or OneDrive folder.
Dynamically name the file (e.g.,
Invoice_{{InvoiceNumber}}.docx).
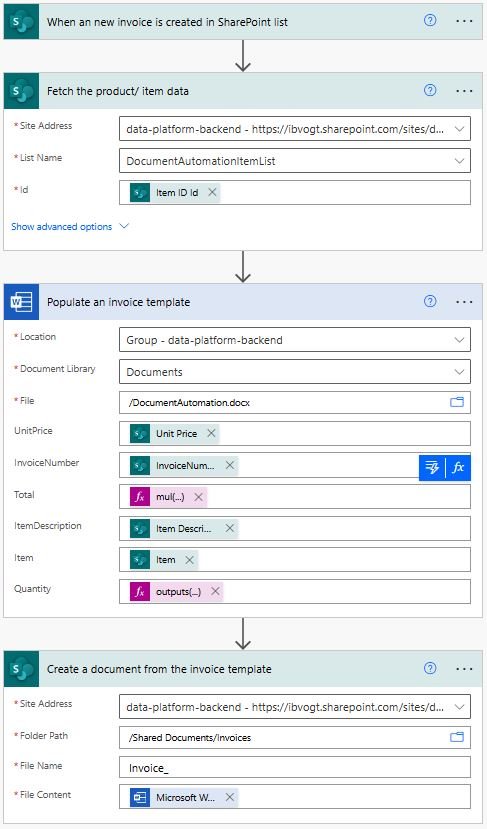
Generate Invoice Document
4. Convert to PDF (Optional)
Use the "Convert Word Document to PDF" action to save the invoice as a PDF.
Store the PDF in the same or another folder for archiving.
5. Send the Invoice via Email (Optional)
Add the action "Send an email (V2)".
Use the recipient’s email address from Excel, attach the invoice (Word or PDF), and include a custom email message.
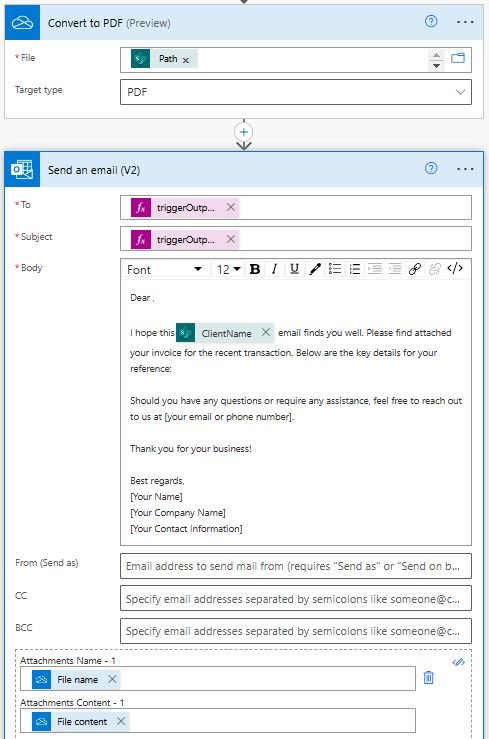
Convert to PDF and Send to the Client
Step 4: Test Your Invoice Workflow
Update the Excel file with new invoice data and trigger the flow manually or automatically.
Verify that the invoices are generated correctly, stored in the specified folder, and emailed if configured.
Check that all placeholders in the Word template are replaced with actual data.
Advanced Features for Invoice Automation
After automating basic invoice generation, you can expand the workflow with advanced capabilities:
Recurring Invoices:
Schedule flows to run monthly or quarterly for subscription billing.Dynamic Tax Calculations:
Add logic to calculate taxes based on location, client type, or product category.CRM Integration:
Pull client data directly from CRMs like Salesforce, HubSpot, or Dynamics 365.Payment Status Updates:
Automatically update the Excel or CRM database when a payment is received.Audit Trails:
Log invoice generation details (e.g., timestamps, recipients) in a SharePoint list or database for tracking and compliance.
Scenarios Where Invoice Automation Adds Value
One of Power Automate’s key strengths is its flexibility. You can automate invoice generation using a variety of triggers tailored to your business needs:
1. When a New Order is Placed
Automatically generate invoices when customers place orders in an e-commerce store or through a CRM like Dynamics 365, Salesforce, or Shopify.
Example Trigger: “When a record is created” in the order management system or payment gateway.
2. Manual Trigger for On-Demand Invoices
Create invoices manually whenever needed, such as for one-off clients or ad-hoc services.
Example Trigger: “Manually trigger a flow” in Power Automate.
3. Scheduled Invoices for Subscriptions
Automate recurring invoice creation for monthly or annual subscriptions.
Example Trigger: A scheduled flow that runs at specific intervals.
4. After a Milestone or Event Completion
Generate invoices upon project completion, milestone approvals, or delivery confirmation.
Example Trigger: “When an item is modified” in a SharePoint list tracking project statuses.
5. Bulk Document Generation for Large Data Sets
Generate hundreds or thousands of invoices at once, using data from Excel, SQL, or a cloud database.
Example Trigger: “When a file is added” to a folder containing the data source.