
Automating Personalized Email Campaigns with Excel and Power Automate
In today’s fast-paced business environment, automation is a game-changer, especially for internal communication, where it helps streamline processes, save time, and ensure messages are tailored to each recipient’s needs. Personalized and customized internal emails can improve engagement and efficiency across departments. This blog will guide you through using a simple Excel table and Power Automate workflow to implement email automation for internal communication within your company.
Use Case Overview
We’ll create a workflow that:
Reads data from an Excel file. For example, a table containing employee details and training schedules.
Sends personalized emails to recipients based on the information in the file, such as inviting employees to specific training sessions.
Automates repetitive communication tasks using conditional logic to save time and eliminate manual effort, like excluding recipients who have already attended the training.
Example Use Cases
1. Human Resources (HR):
Internal communication in HR often requires customization for different recipients. Here’s how automation helps:
Policy Updates: Tailor emails to employees based on department or location with policy details relevant to them.
Employee Onboarding: Send personalized welcome emails with links to role-specific resources.
Training Invitations: Automatically notify employees about upcoming training sessions, excluding those who have already attended.
2. Operations:
Streamline operational communication for enhanced efficiency:
Team Assignments: Notify employees about task allocations or schedule changes based on their roles.
Shift Rotations: Automatically inform employees about their weekly or monthly schedules.
Project Updates: Share progress updates tailored to stakeholders, highlighting relevant milestones.
3. Team Communication:
Enhance collaboration within teams by automating bulk communication:
Task Follow-Ups: Notify team members of pending tasks or deadlines based on their roles.
Event Coordination: Share details of team events or celebrations customized for attendees.
What You Need
Microsoft Excel: To store recipient data. Ensure the "Email" field is mandatory and contains unique values, as it acts as the primary identifier for recipients and ensures that each email is sent to the correct individual without duplication.
Power Automate: To create the automation workflow.
Email Account: A connected Outlook account to send emails. You can use a “service account” for this purpose.
Step 1: Prepare Your Excel File

Example 1. Training Invitations Data

Example 2. Shift Rotations Data
Save the file to a location accessible by Power Automate, such as OneDrive or SharePoint.
Step 2: Create the Power Automate Workflow
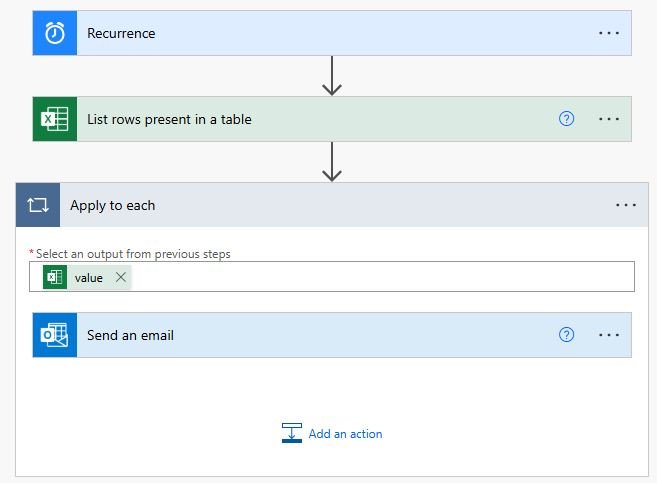
1. Start with a Trigger
Go to Power Automate and create a new flow.
Select the “Schedule Cloud Flow” trigger to run the workflow at specific times or the “Manually” trigger to run it on as-need basis.
2. Add the Excel Connector
Use the “List Rows Present in a Table” action to read data from your Excel file.
Configure it to point to your file and table.
3. Loop Through the Rows
Add a “Apply to Each” action and set it to iterate through the rows retrieved from the Excel file.
4. Create the Email Template
Inside the loop, add an “Outlook - Send an Email” action.
Personalize the email content using dynamic fields from the Excel data and conditional logic. For example:
To:
EmailSubject: “[Customized Subject Line]"
Body:
Hi [Name],<br><br>
[Custom Message]<br><br>
Best regards,<br>
Your Team
Power Automate: Send personalized/ customized emails to employees on a scheduled basis or manually trigger.
Refer to the following blog for nicely formatting the HTML tables before sending to the users: Foolproof Power Automate HTML Table Styling
Note: You can refer to outputs from previous steps in the flow (e.g., data retrieved from Excel) to dynamically populate fields like the recipient’s name, email, or custom message. Power Automate’s dynamic content feature makes it easy to map these fields.
Save and run the workflow to ensure emails are sent correctly. Check for errors or misconfigurations.
Step 3: Monitoring and Adjusting Your Workflow
Check Email Deliverability: Monitor the success of your emails and check for any bounce-backs or delivery failures.
Adjust Content as Needed: Based on feedback, you may want to tweak the message body or subject lines to improve engagement.
Regular Updates: Keep your Excel table updated with new recipients or changes to existing ones to maintain effective communication.
Why Use Excel and Power Automate?
Ease of Use: No coding is required; anyone familiar with Excel and Power Automate can set this up.
Time-Saving: Automate repetitive tasks and reduce manual effort.
Dynamic Personalization: Use conditional logic to tailor emails to specific scenarios.
Scalability: Handle small or large datasets without extra complexity.
Cost-Effective: Leverage existing Microsoft 365 tools to avoid additional costs. For example, small businesses can avoid investing in expensive third-party software by using these readily available tools, enabling efficient communication without straining the budget.